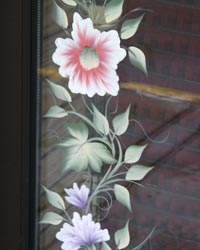
I receive many compliments on the One Stroke decorative painting I have done on windows and storefronts. I also receive many questions about how I do it. Those questions range from, “What paint do you use?” to “Do I have to paint it backwards (reverse painting)?” I am writing this article to explain the methods and supplies I use to achieve my results. Hopefully, this will help you to be successful when painting on windows. Any specific product recommendations that I make are only based on my experience. I am not paid to endorse any specific products.
The first decision you need to make is if the design should be permanent or temporary. All the window painting I’ve done to date was intended to be temporary. In most cases, I’ve found that the client wanted a seasonal design that needed to be changed every three to four months.
Permanent Designs

If you or your client want a permanent design, then my first recommendation is to use the Folk Art Enamels paints. I’ve had a lot of success painting with Folk Art Enamels on glassware, so I would expect similar results on windows. Another option is to use the regular Folk Art acrylic paints with the glass and tile medium, following the directions on the glass and tile medium bottle.
I like using the Enamels because they require one less step and I feel they adhere to the glass better. However, you should feel free to paint with whichever combination you are most comfortable using. Since I don’t have any experience painting on windows with either the Enamels or the combination of paint and glass and tile medium, I can’t tell you how durable the final result will be.
Temporary Designs
Painting a temporary design is, in some ways, easier. You will only need the regular Folk Art acrylic paint and, if you like, floating medium. Do not use glass and tile medium or any kind of sealer. Doing so will only make the eventual removal of your design more difficult or even impossible.
When painting a seasonal, temporary design, you have to remember that it is exactly that, temporary. If you paint storefront doors, then expect to come back a few days later and see minor scratches in the design. If the design is on your front storm door, then a complete season of temperature changes will likely crack or wrinkle the paint.
Preparing to Paint the Window Surface
To ensure that the paint makes good contact with the window surface, the glass should be clean. I usually use warm water and a wash cloth for the bulk of the cleaning. Any remaining stubborn paint spots can usually be easily removed by scraping with a razor blade.
Before you begin painting, you will want to determine the placement of the different elements of your window design. It might be useful to have a sketch on a sheet of notebook paper or reference photographs available for this purpose.
Painting Your One Stroke Design on the Window
You will also need to decide if you’re going to paint the design on the inside or outside of the window.

If you choose to paint on the inside, then you will need to use the reverse painting technique. In one stroke painting, this means that whatever you would normally paint last on a design, should be painted first, then work backwards. This allows the design to look normal when viewed from the outside. Reverse One Stroke painting is more difficult than regular One Stroke painting, so it will probably require some practice and additional advance planning. Look for One Stroke reverse painting teaching guides or classes in your area if you need help learning to reverse paint.
If you choose to paint on the outside, then you will be painting normally. For most painters, this will be faster, since it is the same technique you use to paint on walls, canvas or even the regular teaching guides.
In my experience, if the outside is relatively well protected from the elements, then both inside painting and outside painting will experience the same amount of wear during a three or four month display.
Window Painting Supplies
The following is a list of the items I carry with me when working on a window painting project. Some may be obvious, and not everything may be included. This list is only to help you think about what you might want to have available at a painting site.
| Brushes | A wide selection of One Stroke brushes in various sizes and styles is a must. |
| Paint | I suggest the Folk Art acrylic paint (temporary), Folk Art Enamels paints (permanent), or Folk Art acrylic paint with glass and tile medium (permanent). Choose a range of complementary colors, depending on the season and design. |
| Plates | Styrofoam plates are what I typically use for all my painting projects. |
| Water/Basin | Bring plenty of water and a water basin to clean your brushes. |
| Masking Tape | In case you need to mask off areas to be protected from paint. |
| Paper Towels | I have many uses for paper towels, including brush cleaning and wiping up any spills. |
| Wash Cloth Warm Water | Clean the glass before you begin to ensure that the paint makes good contact with the glass. |
| Razor Blade | To scrape off any excess paint either during cleaning or after painting. |
| Camera | Take a photograph of your completed work. |
Get Painting!
These are the basic techniques and supplies I use when painting windows and storefronts. It is important to remember that these are not the only methods you can use. However, they should help get you on your way to painting beautiful windows. Good luck and keep painting!
This article and pictures © 2004 Crystal Short, All Rights Reserved
